Door Danny Paul van Iersel, 04-6-2024
Configureer Sitecore om B2c te gebruiken
Voor de koppeling met B2C op Sitecore Authenticatie maken wij gebruik van OpenIdConnect.
Belangrijke opmerking bij het gebruik van OpenIdConnect en het gebruik van de TokenClient om het token dat we ontvangen te lezen. Wij gebruiken het IdentityModel pakket, de versie is cruciaal omdat Sitecore deze ook gebruikt. Voor Sitecore gebruikt de Identity Server uit de Sitecore Back-End login versie 3.6.1.
Dit moet overeenkomen met onze implementatie, anders krijgen we afhankelijkheidsproblemen als we proberen in te loggen op Sitecore zelf.
Onderdelen die we nodig hebben om de B2C-verbinding te laten werken:
- Configuratiebestand voor pijplijn en federated authenticatie
- Stel een pijplijn in voor owin.identityProviders en voeg een processor toe
- Maak een FederatedAuthentication aan en neem de verwijzing naar onze IdentityProvider op
- Configureer de IdentityProvider met aanvullende transformatie die we willen gebruiken voor onze claims
- Maak een Sitecore.Owin.Authentication.Services.DefaultExternalUserBuilder – CustomExternalUserBuilder
- Maak IdentityProvidersProcessor
- De middleware die we gebruiken om onze OpenIdConnect-verzoeken af te handelen.
Registratie van B2C in Azure
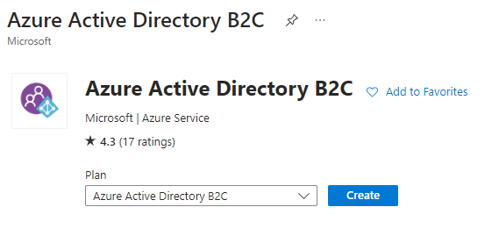
Binnen uw Azure-abonnement selecteert u ‘Een resource maken’. Zoek naar B2C.
Maak een Azure Active Directory B2C.
We hebben de mogelijkheid om:
- Maak een nieuwe Azure AD B2C-tenant
- Koppel een bestaande Azure B2C aan het huidige abonnement
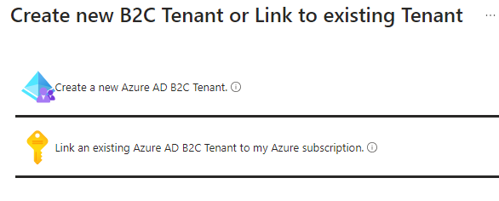
Voor deze demo hebben we een nieuwe Tenant aangemaakt.
Zodra we een nieuwe Tenant hebben aangemaakt, vinden we deze Tenant onder onze bronnen.
Op het overzicht vindt u midden in het scherm de mogelijkheid om de B2C Tenant te openen.

U wordt dan doorgestuurd naar de nieuwe Tenant.
Het kan soms verwarrend zijn dat al uw bronnen lijken te zijn verdwenen. Dit komt omdat we nu in een andere directory zitten. Deze directory is speciaal bedoeld voor de B2C-tenant.
Bij het ontwikkelen en wisselen van de ene directory naar de andere kan het voorkomen dat je de regie kwijtraakt. Houd er rekening mee dat u uw directory bovenaan uw scherm controleert, onder uw profielnaam (of e-mailadres).
Vanuit de B2C kunnen we een standaard gebruikersstroom configureren. Dit is de gemakkelijkste manier om onze verbinding te testen en ervoor te zorgen dat onze omleidingen en terugbelverzoeken correct werken.
Ga naar de gebruikersstromen en kies “Nieuwe gebruikersstroom”. We vinden het gemakkelijk om de aanmeldings- en inlogstroom te gebruiken, omdat deze al verschillende functies bevat die we later nodig zullen hebben.

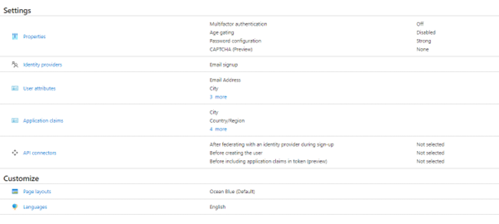
Vervolgens kunt u het beleid configureren.
- Eigenschappen
- Identiteitsproviders
- U kunt verbinding maken met andere providers. De huidige lijst die wordt ondersteund:

- Gebruikersattributen
- Selecteer welke attributen beschikbaar zijn voor de gebruikers
- Dit wordt gebruikt voor het aanmeldingsproces en gebruikers wordt gevraagd deze informatie in te vullen
- Toepassingsclaims
- De claims die naar uw aanvraag worden verzonden
- API-connectoren
- U kunt verbinding maken met andere API’s om extra logica toe te voegen voordat u een gebruiker aanmaakt via de aanmeldingsstroom
- Pagina-indelingen
- Pas uw lay-out van de inlog- of aanmeldingsstroom aan
- Talen
- Mogelijkheid om vertalingen te gebruiken
Zodra we onze stroom hebben geconfigureerd, moeten we onze eigen applicatie registreren. Hierdoor is het mogelijk dat onze applicatie koppelt met onze B2C.
- Een nieuwe registratie toevoegen:
- Vul de naam van uw aanvraag in
- Kies welke accounts worden ondersteund
- Omleidings-URI:
- Dit is de URL die naar onze applicatie wordt doorgestuurd zodra een gebruiker zich heeft aangemeld
- Voorbeeld https://uw.domein/signin-oidc

Configuratie bestand
Nu zullen we onze code configureren. Laten we eerst eens kijken naar het configuratiebestand dat moet worden gepatcht.
<configuration
    xmlns:patch="http://www.sitecore.net/xmlconfig/" xmlns:role="http://ww.sitecore.net/xmiconfig/role/">
    <sitecore role:require="Standalone or ContentDelivery or ContentManagement">
        <pipelines>
            <owin.identityProviders>
                <processor type="Project.Site.Web.IdentityProviders.B2C, Project.Site.Web" resolve="true" />
            </owin.identityProviders>
        </pipelines>
        <federatedAuthentication type="Sitecore.Owin.Authentication.Configuration.FederatedAuthenticationConfiguration, Sitecore.Owin.Authentication">
            <identityProvidersPerSites hint="list:AddIdentityProvidersPerSites">
                <mapEntry name="all" type="Sitecore.Owin.Authentication.Collections.IdentityProvidersPerSitesMapEntry, Sitecore.Owin.Authentication">
                    <sites hint="list">
                        <site>website</site>
                        <site>Project</site>
                    </sites>

                    <identityProviders hint="list:AddIdentityProvider">
                        <identityProvider ref="federatedAuthentication/identityProviders/identityProvider[@id='B2C']" />
                    </identityProviders>

                    <externalUserBuilder type="Project.Site.Meb.IdentityProvlders.UserBuilder.CustomExternalUserBuilder, Project.Site.Web">
                        <param desc="isPersistentUser">false</param>
                    </externalUserBuilder>
                </mapEntry>
            </identityProvidersPerSites>

            <identityProviders hint="list:AddIdentityProvider">
                <identityProvider id="B2C" type="Sitecore.Ovin.Authentication.Configuration.DefaultIdentityProvider, Sitecore.Owin.Authentication">
                    <param desc="name">$(id)</param>
                    <param desc="domainManager" type="Sitecore.Abstractions.BaseDomainManager" resolve="true" />
                    <caption>Log in or create B2C Account</caption>
                    <icon>/assets/Microsoft.png</icon>
                    <domain>sitecore</domain>
                    <transformations hint="list:AddTransformation">
                        <transformation name="map role to idp" type="Sitecore.orin.Authentication.Services.DefaultTransformation, Sitecore.Orin.Autheatication">
                            <sources hint="raw:AddSource">
                                <claim name="idp" value="B2C" />
                            </sources>
                            <keepSource>true</keepSource>
                        </transformation>
                    </transformations>
                </identityProvider>
            </identityProviders>

            <propertyInitializer type="Sitecore.Owin.Authentication.Services.PropertyInitializer, Sitecore.Owin.Authentication">
                <!-- global mappings go here -->
                <maps hint="list">
                    <map name="Email to Email" type="Sitecore.0win.Authentication.Services.DefaultClaimToPropertyMapper, Sitecore.Owin.Authentication">
                        <data hint="raw:AddData">
                            <source name="http://schemas.xmlsoap.org/ws/2005/05/identity/claims/emailaddress"/>
                            <target name="Email" />
                        </data>
                    </map>
                </maps>
            </propertyInitializer>
        </federatedAuthentication>
    </sitecore>
</configuration>
Hier hebben we de volgende secties geconfigureerd:
- Pipeline:
- De pipeline om owin.identityProviders op te nemen
- Federated authenticatie
- We configureren de federated authenticatie waarbij gebruik wordt gemaakt van onze identiteitsprovider
- Identiteitsproviders
- Configuratie van de Identity Provider
- Parameters
- Onderschrift
- Domein
- Transformaties
- Configuratie van de Identity Provider
Vervolgens moeten we onze Provider Processor configureren.
Provider processor
In onze Provider Processor configureren we de instellingen voor de Identity-provider en behandelen we de opties voor omleiden en callbacks.
Hier ziet u de basisconfiguratie voor onze Identity Provider Processor.
using IdentityModel.Client;
using System;
using System.Threading.Tasks;
using Project.Site.Web.Configuration;
using Microsoft.Owin.Infrastructure;
using Microsoft.0win.Security.Notifications;
using Microsoft.Owin.Security.OpenIdConnect;
using Owin;
using Sitecore.Abstractions;
using Sitecore.Diagnostics;
using Sitecore.Owin.Authentication.Configuration;
using Sitecore.Owin.Authentication.Pipelines.IdentityProviders;
using TheReference.DotNet.Sitecore.ApplicationSettings;
using Microsoft.IdentityModel.Tokens;
using Microsoft.IdentityModel.Protocols.OpenIdConnect;
using Sitecore.Owin.Authentication.Extensions;
using Sitecore.Owin.Authentication.Services;
using System.Security.Claims;
using System.Ling:
using Sitecore.Links;

namespace Project.Site.Web.IdentityProviders
{
    public class B2C : IdentityProvidersProcessor
    {
        protected override string IdentityProviderName => "B2C";
        private readonly ISettingsRepository _settingsRepository;
        protected IdentityProvider IdentityProvider { get; set; }

        public B2C(FederatedAuthenticationConfiguration federatedAuthenticationConfiguration,
                ICookieManager cookieManager,
                BaseSettings baseSettings,
                ISettingsRepository settingsRepository)
            base(federatedAuthenticationConfiguration, cookieManager, baseSettings)
        {
            _settingsRepository = settingsRepository;
        }

        protected override void ProcessCore(IdegntityProvidersArgs args)
        {

        }
    }
}
In de ProcessCore-methode voegen we het volgende toe:
protected override void ProcessCore(IdentityProvidersArgs args)
{

    Assert.ArgumentNotNull(args, "args");
    IdentityProvider this.GetIdentityProvider();


    //should be taken fron configuration or settings within your sitecore environment
    var clientID = "your b2c client id";
    var clientSecret = "your b2c secret";
    tenant = "your tenant Name";
    var policy = "Policy Name";
    var redirecturi= "https://Your.Domain/signin-oidc";
    var instanceUrl = "https://" + tenant + ".b2clogin.com/{0}/{1})";
    var tenantDomain = tenant + ".onmicrosoft.com";

    var authenticationType = this.GetAuthenticationType();

    var openIdAuthOptions new OpenIdConnectAuthenticationOptions(authenticationType)
    {
        //Generate the address using the tenant and policy information
        MetadataAddress = String.Format(instanceurl + "/v2.0/.well-known/openid-configuration", tenantDomain, policy),

        // These are standard OpenID Connect parameters, with values pulled from web.config
        ClientId = clientID,
        RedirectUri = redirectUri,
        PostLogoutRedirectUri = redirectUri,
        ResponseType = "code id_token",

        // Specify the callbacks for each type of notifications
        Notifications = new OpenIdConnectAuthenticationNotifications
        {
            //RedirectToIdentityProvider OnRedirectToIdentityProvider,
            AuthorizationCodeReceived = OnAuthorizationCodeReceived,
            AuthenticationFailed = OnAuthenticationFailed
        },

        // Specify the claim type that specifies the Name property.
        TokenValidationParameters = new TokenValidationParameters
        {
            NameClaimType "name",
            ValidateIssuer= false
        }
        Caption = Identityprovider.Caption.
        Authority = String.Formt(instanceUrl, tenantDomain, policy),
        UseTokenLifetíme false, //indicates if we want authentication session lifetime(authentication cookie) to match lifetime of the token
        ClientSecret = clientSecet, //Client application Secret
        Scope = "openid" // openid offline_access are used per oidc specification. If you want to access specific or custom scopes in the response will have to add 'token' to ResponseType.
    };

    args.App.UseOpenIdConnectAuthentication(openIdAuthOptions);
}
De variabelen zoals ClientID en Secret moeten worden opgeslagen in elk configuratiebestand of site-instellingen binnen de Sitecore-omgeving.
De maximale leeftijd van het Client Secret is 24 maanden, houd er rekening mee dat deze variabele instelbaar moet zijn.
We maken een nieuwe set opties voor de OpenIdConnectAuthenticationOptions.
Het MetadataAddress bevat de configuratie van de B2C URL’s. Het zal de gebruiker naar het inlogscherm leiden dat is ontworpen voor het beleid dat we hebben geconfigureerd.
Met Notificaties stellen we de callback in zodra de gebruiker heeft ingelogd. Als de authenticatie is mislukt of als we een authenticatiecode ontvangen.
Uiteindelijk moeten we onze applicatie registreren om de authenticatie te gebruiken. Met args.App.UseOpenIdConnectAuthentication(openIdAuthOptions); we hebben de applicatie ingesteld om deze configuratie te gebruiken voor onze identiteitsprovider.
private async Task OnAuthorizationCodeReceived(AuthorizationCodeReceivedNotification notification)
{
    var clientID = "Your b2c Client ID":
    var clientSecret = "You b2c Secret";
    // Exchange code for access and ID token
    var tokenclient = new TokenClient (string.Concat(notification.options.Authority, "/oauth2/v2.0/token"),
                        clientID, clientsecret);
    var tokenResponse = await tokenClient.RequestAuthorizationCodeAsync(notification.Code, notification.RedirectUri);
    if (tokenResponse.IsError)
    {
        HandleAuthorizationError(notification);
        return;
    }

    var claimsIdentity = notification.AuthenticationTicket.Identity as ClaimsIdentity;
    var firstName = claimsIdentity.Claims.FlrstorDefault(c=> c.Type == "http://schemas.xmlsoap.org/ws/2005/05/identity/claims/givenname")?.Value;
    var lastlame - claimsIdentity.claims.FirstOrDefault(c => c.Type == "http://schemas.xmlsoap.or:/ws/2005/05/1dentity/claims/surname")?.Value;
    var nameArray - new[] ( firstName, lastName );
    string fullName = string.Join(" ", nameArray.Where(s -> !string.IsNull0rEmpty(s)));
    claimsIdentity.Addclaim(new Claim("FullName", fullName));
    notification.AuthenticationTicket.Identity.ApplyClaimsTransformations(new TransfornationContext(this.FederatedAuthenticationConfiguration, this.IdentityProvider));

    var dashboardPageUrl = "%2fDashboard";
    var returnUri = "/identity/externallogincallback?ReturnUrl=" + dashboardPageUrl + "&sc_site=website&authenticationsource=Default";

    var requestedDomain = _settingsRepository.GetSetting(Settingkeys.InternalGoogleSamlProviderSSOServiceEntityID);
    if (string.IsNullOrEmpty(requestedDomain))
    {
        requestedDomain = "https://Your.Domain";
    }

    notification.AuthenticationTicket.Properties.Redirecturi = new Uri(requestedDomain + returnUri).ToString();
}

private void HandleAuthorizationError(AuthorizationCodeReceivedNotification notification)
{
    var authErrorRelativePath = "/500-error";
    // Log Error
    notification.HandleResponse();
    notification.Response.Redirect(authErrorRelativePath);
}
Samenvatting van onze implementatie
We hebben de provider ingesteld en de volgende instellingen geconfigureerd die moeten worden gebruikt:
- Tenant
- De tenantnaam van onze B2C Azure Active Directory
- Beleid
- Het beleid dat we binnen Azure B2C hebben geconfigureerd om te gebruiken voor onze inlog-/aanmeldingsstroom
- Omleidings-URL
- De URL waar we naar terugkeren na het inloggen, bijvoorbeeld https://<Uw Sitecore URL>/signin-oidc”
- Klant identificatie
- Het applicatie-(client)-ID uit de applicatieregistratie
- Klantgeheim
- Het geheim dat we hebben geconfigureerd bij de B2C-applicatieregistratie
- Houd er rekening mee dat de maximale leeftijd van dit geheim 24 maanden is
- Het geheim dat we hebben geconfigureerd bij de B2C-applicatieregistratie
We kunnen nu onze OpenIdConnectAuthenticationOptions instellen. De opties die we instellen zijn:
- Metagegevensadres
- Klant identificatie
- Klantgeheim
- RedirectUrl
- Reactietype
- Meldingen (een type OpenIdConnectAuthenticationNotifications)
- Hier kunnen we de taken definiëren die moeten worden uitgevoerd wanneer de autorisatiecode is ontvangen of de authenticatie is mislukt.
- TokenValidationParameters
- Domein
Het laatste deel is het registreren van onze applicatie om OpenIdConnect te gebruiken:
args.App.UseOpenIdConnectAuthentication(openIdAuthOptions);
Conclusie
Na het instellen van onze provider hebben we een pagina nodig waarop de inlogmethoden kunnen worden weergegeven.
var args = new GetSignInUrlInfoArgs("website", url);
args.Result.ToList();
Hiermee kunnen wij onze inlogmogelijkheden doorlopen. Het is geweldig om mee te werken en heel gemakkelijk aan te passen.
Om te weten hoe u de B2C custom policies moet configureren lees ons tweede deel: Sitecore authentication with Azure B2C Custom policies Part 2
Heeft u problemen met uw authenticatie-instellingen of heeft u hulp nodig? Neem contact met ons op.
Wij helpen u graag.
Contacteer ons
Klaar om je digitale ervaring naar een hoger niveau te tillen? Neem gerust contact met ons op voor meer informatie over onze diensten en hoe we jou kunnen helpen het volledige potentieel van je digitale marketing te benutten.
Vertel ons over je project
En we komen met een oplossing op maat
Neem contact op met één van onze consultants om de perfecte match te vinden die bij je past en waarmee je kunt groeien.